This project started with a wild thought in the shower: What if I made a clock… bigger than me? I had no client, no deadline, and no clear plan. Just an idea — and a lot of curiosity. Here’s how it all unfolded.
Like most breakthroughs, this one came to me in the shower 😄
"What if there was a clock... as big as me?"
Whoa. That would be amazing!
But how would I make it? Honestly, maybe it wouldn’t be that hard. I remembered Adam Savage from MythBusters building props from foam, and I’d seen others making large shapes from styrofoam or insulation foam too. It’s a thing.
So I figured — I’ll cut the body of the clock from insulation foam on my CNC (Tsanko), use veneered MDF for the wood section, and even design my own clock mechanism.
I briefly searched for a ready-made oversized mechanism, but quickly gave up. I knew I wouldn’t find exactly what I wanted. And more importantly — if I designed and built my own, I’d learn something new and have a reusable mechanism I could 3D print any time in the future.
So... there was really no reason not to make this clock. Nothing was stopping me.
Sure, I only had a general idea of how it might work, but I’d figure things out as I went. I just needed to start somewhere — and I did, with the one thing I knew would work:
Step 1: Buy insulation foam
Why insulation foam? Cheap, easy to cut, and low risk. For just 100 BGN, I got 10 sheets of 3cm, 4 sheets of 2cm, and two cans of foam adhesive.
A few days after the idea hit me, my friend and fellow craftsman Davis stopped by the workshop with his 5-year-old son Philip. I don’t even remember if he came for a reason or just to take a walk. But when I explained my crazy clock idea, he said:
“Let’s go buy the foam right now.”
We jumped in his car (mine couldn’t fit all those sheets) — and that was the start of this project.
Funny how these moments work: if he hadn’t shown up right then, I probably would’ve postponed it by a day… or twenty.

Step 2: Cut the foam
When I first told Natali (my amazing wife who was 9 months pregnant at the time) about the idea — that I wanted to build a clock her size — she got excited and encouraged me to do it.
After we bought the foam, she even helped glue the first half of the clock body together. I had already broken down the model into slices and knew the general plan. We stacked and glued the foam, pressed it flat, and left.
The very next day, I mounted the block onto Tsanko (my CNC), and watching it come to life was magical. For the first time, I didn’t have to imagine a clock that big — it was forming before my eyes. And it looked awesome.


Step 3: Body filler (the messy part)
I rushed into it a bit, using bumper filler for cars. A friend had suggested a mix of white glue and putty, but it didn’t seem strong enough. Bumper filler is tough and elastic — seemed like the right choice.
Natali helped me apply the first layer, but even with a mask the smell was too strong, so I continued alone. The process? Constantly mixing small batches, applying quickly, cleaning tools with acetone, sanding, reapplying, and repeating.
I went through 8 kilograms of filler.
At first, I wanted a smooth, perfect finish. Two days later, I decided the imperfections were actually an effect, not a defect 😄 I did a final smoothing with some acrylic filler, though it might’ve been optional.


Step 4: Paint
The plan was to go full black. But while sanding and filling, both Natali and I fell in love with the raw “stone” look of the unfinished surface. Still, this one was already promised to be black.
I primed it, painted it with black acrylic paint, and sealed it with lacquer. The result? It looked... cheap. Like a wall decoration from a discount store.
So I painted over it again — but acrylic paint without a clear coat is too fragile to touch.
Finally, I found a textured spray for bumpers. And that was it — matte, rough, sandy texture. It looked solid, heavy, and real. I actually started loving it.


Step 5: The mechanism
I’ve been learning Fusion 360 for about a year now — mainly to run Tsanko. It’s an amazing tool, and I wish I’d started using it earlier.
I designed a large custom mechanism (25x25x8cm) using a stepper motor and a controller that moves the minute hand 6° every minute. The hour hand moves separately, powered by gears connecting the two axes. I used bearings for strength, so it can handle even bigger hands if needed.
The result? It worked better than I expected.
It can definitely be improved, but I managed to build something I wasn’t even sure I’d be able to. That alone was enough — not to make me feel proud, but thankful. Fortunate. And maybe a little more confident than before.


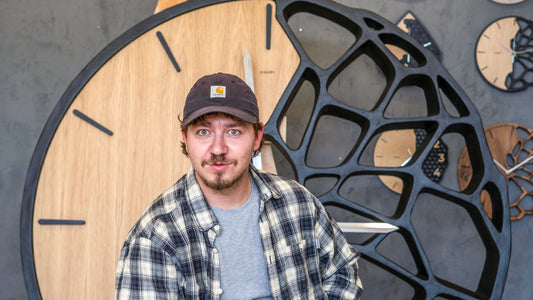
Step 6: The result
I’m happy with how the clock turned out. It’s one of those things that, if I saw it somewhere, I’d instantly fall in love with it.
But honestly, after so much time spent thinking, planning, fixing, and reworking — what I felt most was a kind of quiet relief.
Not pride. More like… a sense of "I did it. Finally."
I got through something that felt out of reach when I started — something that kept me awake, excited, and exhausted for a month. It was constantly on my mind.
And the deadline... that was the real monster.
Now that it’s done, I know that with a little distance, I’ll look at it again and appreciate it even more.


Step 7: It sold before it was even finished
About 10 days after I bought the foam, the graduating class of 2025 from AUBG reached out. They wanted to commission a large clock to gift to their university. Talk about perfect timing!
We talked, they loved the idea, and just like that, the clock had a client — and a deadline. Two weeks.
For those two weeks, I worked nonstop. Even when I wasn’t in the workshop, the clock was in my head.
And once it was done… I was exhausted. But proud. And next week, I’ll install it at their campus.
The lesson?
There were moments where I questioned myself — "Am I wasting time doing this, instead of just focusing on selling what I already have?"
But this is one of the best parts of my work: I get to try anything I want. And so many times, when I thought I was doing something “pointless,” it turned out to be exactly the right path — either because it brought money, new skills, or just pure experience.
Final thoughts
I’m really glad Natali supported me with this project.
It’s funny — when I started, and friends came by the workshop and saw the foam slices, they’d ask,
“Who ordered it?”
“Who’s it for?”
And I’d say, “No one. I’m just making it. Because I can.” 😄
And I could — I had the time to “waste” on something like this.
It’s interesting how even I sometimes think that doing something just because you want to — not because it’s paid or urgent — feels like a “waste.”
But it’s not.
Ten days in, someone asked for exactly what I had already started. And that’s been the pattern again and again in my work. Just start — and see what comes.